My daughter is a surgical resident at one of the US ENT (That's ear-nose-throat) programs and for a couple of years now has been enjoying her custom made (by yours truly) scrub caps. Custom scrub caps are a HUGE deal - in case you did not know.
She asked me to make a cool scrub cap for her the summer she started her residency. I ended up developing my own pattern after many hours digging around on the internet trying to find a pattern that would work for a particular surgical scrub cap she had described to me.
We went crazy and added 'Dr. -insert last name here-' on bias tape of her new scrub cap made of fabric with Russian nesting dolls pattern. Since then she got married, I made a couple more scrub caps for her with the new last name next to 'Dr.'
About two weeks ago she texted me that she lost her favorite hat made out of fabric she liked very much, that was just perfect (elastic band in the back and a tight fit).
Not a problem, I could make a scrub cap for her in no time at all! But now her hair is long and she really wanted a scrub cap with the same tight fit but with a pony tail pouch! Back to the drawing board I went! :-)

I made a scrub cap with a pony tail pouch for my daughter (there is a picture at the end of this page, modeled by my good friend) and below you can find my own tutorial here on my blog. As usual, it comes with How to DIY Video as well.

6 inches of elastic braided tape
Thread of color matching one of your fabric colors
Please wash, dry and iron fabric before you start cutting – it will shrink
1. Wash, dry and iron fabric before working with it, otherwise your scrub cap will shrink when you wash it.
2. Make your paper pattern using measurements below:
Side of Cap:
19” wide (including length of ties)
5” high
2” high for ties
at 7” tapering toward ties starts
Top of Cap:
16 & ½” wide
7 & ½” high
Pony tail pouch part of top of cap is 7” wide and 5 & 3/8” high
Back Side of Ponytail Pouch:
7” wide and 5 & 3/8” high
Casing for Elastic Band:
10 & 1/2” wide and 1” high

3. Cut your pattern out, fold your fabric so you have two layers under the side part of your cap and single layer under the top of your cap, back side of ponytail pouch and elastic tape casing.

- Place short side of cap (center that will cover forehead) pattern on fold in fabric
- Using pencil (or pen) of contrasting color to fabric trace a line on fabric around the edges of the paper pattern, and a spot where you will start ironing down fabric (black dash on curvy line of side part of your scrub cap.
- You need 2 layers of fabric ONLY for side of cap
- You need ONLY 1 layer of fabric for:
top of cap
back side of pony tail pouch
1” x 10” casing for elastic tape
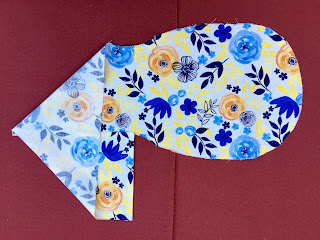
In the picture below you can see that I cut out top layer (1/2) of the side part of the cap - it is wrong side up in the picture, and placed paper patterns for top part, and casing for elastic tape on single layer of fabric. I put them on the right side of fabric to make it easier for your to see.

This is how pieces of scrub cap should look like once cut out: two layers of fabric for side part of your scrub cap and one layer for top part with pony tail pouch and one layer for elastic tape casing.

Red arrows show stress points of the scrub cap that need to be reinforced on both side part and top part of it.
To do that you need to fold fabric using hot iron, and stitch it through using zigzag pattern using the following steps.

4. Here are steps to follow after you cut the fabric:
a. On the wrong side of side part iron down fabric using hot iron on back ends of side part of the cap.
- I marked them by pins with pink balls.
b. Fold that curvy part one more time and iron it down again.
The mark is about 1 and ½” from ties.
c. Iron down ¼” of fabric along bottom of side part and around ties.

5. Fold ties in half length wise and iron it down. Continue that fold at the bottom of side part, iron it down too.

This is a closer look at curvy folds of side of cap ironed down twice.
Note, that you also need to fold ties in half length wise, and continue that fold at the bottom of side part.

This is how back curves of side part of scrub cap should look like after you apply zigzag stitch to secure fabric folds you just created.

I use a little trick to make ends of ties with look nice:
a. I iron down one long side of tie first.
b. Then I fold down short side of that tie.
c. And iron down the other long side of the same tie.
d. I repeat the process on the second tie.

6. The next step is to interlock fabric folds on short ends of both ties before stitching through them in a couple more steps.


7. To finish preparing side part of your scrub cap so it looks like you see in this image, you need to make a seam with zigzag stitch to secure sides of ties together and wide fold to side part of the scrub cap.

Here's how you can give the side part of your scrub cap with a pony tail pouch a finished look:
a. Place your scrub cap right side down and starting at beginning of one tie make a seam using zigzag stitch to the end of that tie.


b. Start stitching wide fold to the side of cap starting at the same spot as the previous step – at the end of curvy part of side cap with stitched through fold.


c. Finish stitching through wide fold on bottom of side part and finish your seam at the corner of the other tie. Note how folds are interlocked to create clean look.


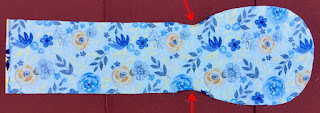
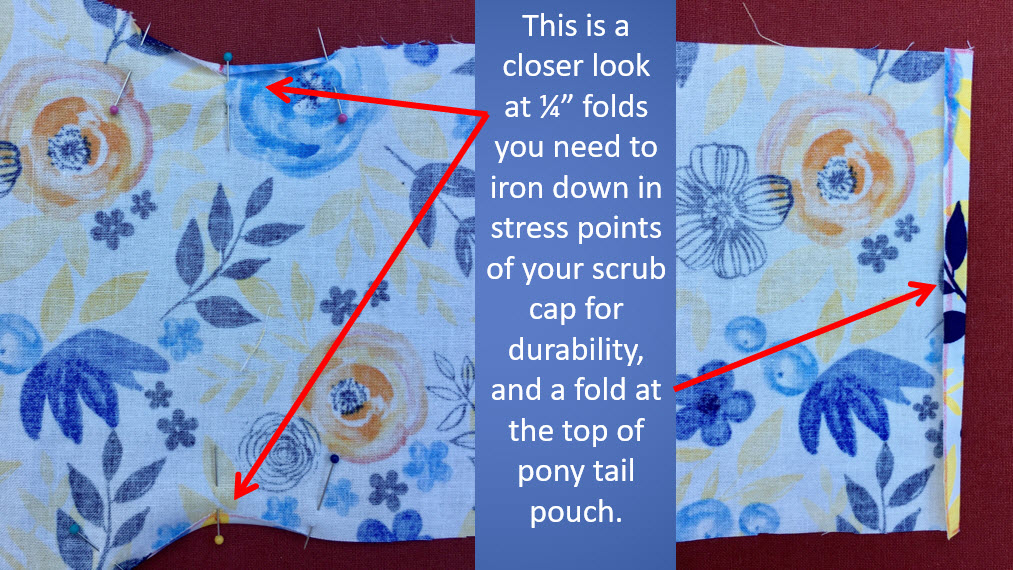
8. On the wrong side of top part of the cap mark places where you will start fabric folds 1” to the left and to the right from the point where you will later attach pony tail pouch.
I put pins in those spots. Now fold fabric using hot iron.

This is a closer look at ¼” folds you need to iron down in stress points of your scrub cap for durability, and a fold at the top of pony tail pouch.

This is how sides of top part of your scrub cap should look like after you apply zigzag stitch to secure fabric folds you created in the previous step.

9. Make a fold in pony tail side of top part of your scrub cap at 7”. Place back part of ponytail pouch right side to right side of top part of your scrub cap with corners of back side of ponytail pouch overlapping top part of scrub cap about ¼”.

10. Make straight stitch 3/8” from the edge of fabric and finish at the fabric fold at the end of pony tail pouch.
Use zigzag stitch to secure edges of ponytail pouch where you just applied straight stitch to give that side of pouch finished look.

I always cut off excess fabric after I attach edges of fabric together for a clean look.

11. The next step is folding 1/4” of fabric on all 4 sides of 1” wide 10” long piece of fabric to make a casing for elastic tape.

12. In this step prepare a spot for elastic tape casing by ironing down the seam between top part of cap and back side of pony tail pouch, in a way that top part of cap stays flat, but back side of ponytail pouch is folded away to the other side of the seam (down in this image).
Now flip the top part of cap wrong side up.
You have already prepared the future casing for elastic tap, it will go along the free edge of back side of ponytail pouch, and across top part of cap, just like you see in the next image

Long side of elastic tape casing should be aligned with the edge of ponytail pouch (top side of image) and right at the mark on top part you made before enforcing stress points where you see a purple arrow on this image.
Short ends of the casing should be ¼” away from edges of top side of cap and back side of ponytail pouch.

Casing for elastic tape ended up needing to be about 9 and 7/8”, so I made it shorter, and re-ironed short ends of it before securing it to the top part with pins


13. Use zigzag stitch to secure each long side of casing to the top part of cap and back part of ponytail pouch with two separate seams.
Leave short ends of casing open, you will thread elastic tape through it at the last step of making this scrub cap.

14. In this step make a seam using straight stitch on the other side of pony tail pouch, making sure that free edges of top side of cap and back side of ponytail pouch meet, while the edge with elastic tape casing overlaps the zigzag stitch enforced curve top side of cap about 1/4”– I marked it by red arrow.

15. The next steps already done here are:
a. Make straight stitch connecting back and front sides of ponytail pouch together (purple arrows).
Very important – straight stitch should not run across short ends of elastic tape casing, they should be free (red arrows).
b. Use zigzag stitch to secure edges of front and back sides together (blue arrow).

Safety pin should easily fit from both ends of elastic tape casing like you see in the left and right images. I simply wanted you to see exactly how it would look on your scrub cap when casing is stitched to the cap properly and the straight seam connecting back and front sides of ponytail pouch does not run over the casing.

16.
a. Find middle of side part of scrub cap (red arrow)
b. Find middle of top part of scrub cap (red arrow)
Put these two parts together right sides toward one another, connecting middles and ends of side part of cap (blue arrows) ½” from ends of side part narrow ends with spots on top part of cap where casing for elastic tape is stitched to the top part of cap (purple arrows)

In this image middles are connected by a pin with big red ball (red arrow) and ends of side part of cap are connected to the top part of cap by pins with pink and blue balls (blue arrows).
Pin the rest of side part to the top part of the cap together with ½” between the pins.

In this image you can see that side part of your scrub cap is pinned to top part (where the pony tail pouch starts) at about 8 and ½” length of ties.

I folded both ties to let you see where the seam connecting top and side parts of your scrub cap should stop – at the very right pins in this image.

17. Stitch top part and side part of cap together starting at one of pins at tie, toward the pin in the middle (with big red ball). The seam should be at ½” from the edge of fabric. Finish the seam at the last pin on the other side.

18. This is how your scrub cap will look like once you do both – straight and zigzag seams connecting top and side parts of the cap.

19. In this step thread elastic tape with safety pins on both ends (one of them to keep the end of elastic tape under control), through the casing.

20. When the first safety pin is out of the casing at the other end of it, pull both ends of elastic tape at the same time so about 1 and ½ inch of it is out of the casing and remove safety pins. Place ends of elastic tape one over the other so they overlap about ½”


21. Use zigzag stitch to secure elastic tape ends together.

22. Your elastic tape is now fixed together and you can pull the casing so your elastic tape is completely inside it. Turn ponytail pouch out to the right side.

Congratulations!


She asked me to make a cool scrub cap for her the summer she started her residency. I ended up developing my own pattern after many hours digging around on the internet trying to find a pattern that would work for a particular surgical scrub cap she had described to me.
We went crazy and added 'Dr. -insert last name here-' on bias tape of her new scrub cap made of fabric with Russian nesting dolls pattern. Since then she got married, I made a couple more scrub caps for her with the new last name next to 'Dr.'
About two weeks ago she texted me that she lost her favorite hat made out of fabric she liked very much, that was just perfect (elastic band in the back and a tight fit).
Not a problem, I could make a scrub cap for her in no time at all! But now her hair is long and she really wanted a scrub cap with the same tight fit but with a pony tail pouch! Back to the drawing board I went! :-)
Want my Scrub Cap with a Pony Tail Pouch Printable Pattern? - It is available
(click Etsy logo to access)
(Scrub Cap For Long Hair printable pattern comes in PDF format and prints on letter size and A4 paper. You will get a PDF with instructions and pictures, and a link to video instructions. All sales are final, no returns)
I made a scrub cap with a pony tail pouch for my daughter (there is a picture at the end of this page, modeled by my good friend) and below you can find my own tutorial here on my blog. As usual, it comes with How to DIY Video as well.
If you want to zoom on the pictures, click them, and they will enlarge.

You will need:
Paper to make the pattern – all measurements are in inches
13 inches of cotton fabric – standard 44 inch width6 inches of elastic braided tape
Thread of color matching one of your fabric colors
Please wash, dry and iron fabric before you start cutting – it will shrink
Follow the steps below to make your own scrub cap with a pony tail pouch:
1. Wash, dry and iron fabric before working with it, otherwise your scrub cap will shrink when you wash it.
2. Make your paper pattern using measurements below:
Side of Cap:
19” wide (including length of ties)
5” high
2” high for ties
at 7” tapering toward ties starts
Top of Cap:
16 & ½” wide
7 & ½” high
Pony tail pouch part of top of cap is 7” wide and 5 & 3/8” high
Back Side of Ponytail Pouch:
7” wide and 5 & 3/8” high
Casing for Elastic Band:
10 & 1/2” wide and 1” high


- Using pencil (or pen) of contrasting color to fabric trace a line on fabric around the edges of the paper pattern, and a spot where you will start ironing down fabric (black dash on curvy line of side part of your scrub cap.
- You need 2 layers of fabric ONLY for side of cap
- You need ONLY 1 layer of fabric for:
top of cap
back side of pony tail pouch
1” x 10” casing for elastic tape
In the picture below you can see that I cut out top layer (1/2) of the side part of the cap - it is wrong side up in the picture, and placed paper patterns for top part, and casing for elastic tape on single layer of fabric. I put them on the right side of fabric to make it easier for your to see.


To do that you need to fold fabric using hot iron, and stitch it through using zigzag pattern using the following steps.

4. Here are steps to follow after you cut the fabric:
a. On the wrong side of side part iron down fabric using hot iron on back ends of side part of the cap.
- I marked them by pins with pink balls.
b. Fold that curvy part one more time and iron it down again.
The mark is about 1 and ½” from ties.
c. Iron down ¼” of fabric along bottom of side part and around ties.


Note, that you also need to fold ties in half length wise, and continue that fold at the bottom of side part.


a. I iron down one long side of tie first.
b. Then I fold down short side of that tie.
c. And iron down the other long side of the same tie.
d. I repeat the process on the second tie.


7. To finish preparing side part of your scrub cap so it looks like you see in this image, you need to make a seam with zigzag stitch to secure sides of ties together and wide fold to side part of the scrub cap.

a. Place your scrub cap right side down and starting at beginning of one tie make a seam using zigzag stitch to the end of that tie.


c. Finish stitching through wide fold on bottom of side part and finish your seam at the corner of the other tie. Note how folds are interlocked to create clean look.


8. On the wrong side of top part of the cap mark places where you will start fabric folds 1” to the left and to the right from the point where you will later attach pony tail pouch.
I put pins in those spots. Now fold fabric using hot iron.

This is a closer look at ¼” folds you need to iron down in stress points of your scrub cap for durability, and a fold at the top of pony tail pouch.
This is how sides of top part of your scrub cap should look like after you apply zigzag stitch to secure fabric folds you created in the previous step.


9. Make a fold in pony tail side of top part of your scrub cap at 7”. Place back part of ponytail pouch right side to right side of top part of your scrub cap with corners of back side of ponytail pouch overlapping top part of scrub cap about ¼”.

10. Make straight stitch 3/8” from the edge of fabric and finish at the fabric fold at the end of pony tail pouch.
Use zigzag stitch to secure edges of ponytail pouch where you just applied straight stitch to give that side of pouch finished look.

I always cut off excess fabric after I attach edges of fabric together for a clean look.

11. The next step is folding 1/4” of fabric on all 4 sides of 1” wide 10” long piece of fabric to make a casing for elastic tape.

12. In this step prepare a spot for elastic tape casing by ironing down the seam between top part of cap and back side of pony tail pouch, in a way that top part of cap stays flat, but back side of ponytail pouch is folded away to the other side of the seam (down in this image).

Now flip the top part of cap wrong side up.
You have already prepared the future casing for elastic tap, it will go along the free edge of back side of ponytail pouch, and across top part of cap, just like you see in the next image

Long side of elastic tape casing should be aligned with the edge of ponytail pouch (top side of image) and right at the mark on top part you made before enforcing stress points where you see a purple arrow on this image.
Short ends of the casing should be ¼” away from edges of top side of cap and back side of ponytail pouch.

Casing for elastic tape ended up needing to be about 9 and 7/8”, so I made it shorter, and re-ironed short ends of it before securing it to the top part with pins


13. Use zigzag stitch to secure each long side of casing to the top part of cap and back part of ponytail pouch with two separate seams.
Leave short ends of casing open, you will thread elastic tape through it at the last step of making this scrub cap.

14. In this step make a seam using straight stitch on the other side of pony tail pouch, making sure that free edges of top side of cap and back side of ponytail pouch meet, while the edge with elastic tape casing overlaps the zigzag stitch enforced curve top side of cap about 1/4”– I marked it by red arrow.

15. The next steps already done here are:
a. Make straight stitch connecting back and front sides of ponytail pouch together (purple arrows).
Very important – straight stitch should not run across short ends of elastic tape casing, they should be free (red arrows).
b. Use zigzag stitch to secure edges of front and back sides together (blue arrow).

Safety pin should easily fit from both ends of elastic tape casing like you see in the left and right images. I simply wanted you to see exactly how it would look on your scrub cap when casing is stitched to the cap properly and the straight seam connecting back and front sides of ponytail pouch does not run over the casing.

16.
a. Find middle of side part of scrub cap (red arrow)
b. Find middle of top part of scrub cap (red arrow)
Put these two parts together right sides toward one another, connecting middles and ends of side part of cap (blue arrows) ½” from ends of side part narrow ends with spots on top part of cap where casing for elastic tape is stitched to the top part of cap (purple arrows)

In this image middles are connected by a pin with big red ball (red arrow) and ends of side part of cap are connected to the top part of cap by pins with pink and blue balls (blue arrows).
Pin the rest of side part to the top part of the cap together with ½” between the pins.

In this image you can see that side part of your scrub cap is pinned to top part (where the pony tail pouch starts) at about 8 and ½” length of ties.

I folded both ties to let you see where the seam connecting top and side parts of your scrub cap should stop – at the very right pins in this image.

17. Stitch top part and side part of cap together starting at one of pins at tie, toward the pin in the middle (with big red ball). The seam should be at ½” from the edge of fabric. Finish the seam at the last pin on the other side.

18. This is how your scrub cap will look like once you do both – straight and zigzag seams connecting top and side parts of the cap.

19. In this step thread elastic tape with safety pins on both ends (one of them to keep the end of elastic tape under control), through the casing.

20. When the first safety pin is out of the casing at the other end of it, pull both ends of elastic tape at the same time so about 1 and ½ inch of it is out of the casing and remove safety pins. Place ends of elastic tape one over the other so they overlap about ½”


21. Use zigzag stitch to secure elastic tape ends together.

22. Your elastic tape is now fixed together and you can pull the casing so your elastic tape is completely inside it. Turn ponytail pouch out to the right side.


Congratulations!
This is your finished cap – this is how your cap looks from the front and back with ties free and tied together.
My friend modeled a bunch of scrub caps for long hair I've made for my daughter :-)
Want my Scrub Cap with a Pony Tail Pouch Printable Pattern? - It is available
(click Etsy logo to access)


Click on the picture below to see all my videos on how to make scrub caps!
No comments:
Post a Comment